Monday, January 31, 2011

boy's room :: bedding

I have been looking around {the internet} for bedding inspiration for 7's room. Since his walls are so busy and bright, his bedding really needs to be a calm, muted *pattern*.

After thoroughly searching the regulars like Pottery Barn Kids, Crate & Barrel, Land of Nod --and many more-- I came to the conclusion that I should make my own.

I searched Spoonflower for fabric samples, and there are a lot of options.


Jailhouse Rock


Faux Bois


Pear Harvest


Unfortunately, after a few quick calculations, I realized that I would need about 11 yards of fabric to make a twin-sized comforter cover.

11 yards of fabric = approx. $200!!!


So I went back to the internet, and found myself at West Elm. I found a few options, but I think this one is my favorite.

West Elm


This is another photo, but it's not the color we would get.


The platinum color (top picture) will go nicely in 7's room. Also it's machine washable which is very important in a boy's room. Do you know how filthy little boys can be?!

I'm not worried that it's too bland because I'm sure there will be a lot of other colors on 7's bed: stuffed animals, his favorite ugly doll, an accent pillow...

John just has to build the loft bed now...

Sunday, January 30, 2011

curb appeal :: a new perimeter


One of the things I LOVE about this house is the fence that surrounds the entire property. Being a mom, I can feel assured that 7 and 4 are safe when they are playing outside.

That being said, John and I have plans to change the look of the fence.

image via


Yes, that is the house from Californication.


John gets full credit, because he is the one with the original idea to build a fence outside perimeter that is concrete on the bottom and wood slats on the top.

I was skeptical until I saw this house on an episode of Californication. But then, once I had the visual, it was instant love. Sign me up: For the concrete wall. For the horizontal wood slats. For the snake grass growing in front.

image via Dwell


The above image has only the wooden slats, but we will definitely be doing concrete on the bottom. Our reasoning is twofold.

One, we just like the look of it.

Two, it's a preventative feature. See, our house is located within the 100-year Flood Zone map. It's on the very, very edge, but it's there alright. Lucky us.

Anyhow, to best prevent our property from flooding (should that 100-year storm ever happen...) is to have a solid wall surrounding the property. We can just sandbag the areas that don't have the wall...

This fence/wall project won't happen for a while. In fact, it will probably be a couple of years from now. But it's nice to know where we're going with it.

Thursday, January 27, 2011

mood board :: a little boy's room


My first attempt at creating a mood board, via Polyvore.


The funny irritating thing about Polyvore is that you are limited in which images you can use. Therefore, I had to fudge the orange striped walls and the bunk beds.

Other things envisioned for 7's room:
  • grey-ish bedding
  • insect posters
  • mini vintage globes
  • a large chalkboard or magnetic board
  • legos strewn about the room!!
  • a big graphic G
  • a solar system mobile -- 7 and I have plans to make one


p.s. 7 has picked all of the above for his room. And this mom approves.

Wednesday, January 26, 2011

the big reveal :: striped walls

I can't believe I finally get to post pictures of the finished product.


Obviously, this was the wall that took the longest to finish.


I know. It's a *little* busy. And bright. Can you see why I was second-guessing myself when I was midway through the project?!

Keep in mind that the painted wall is where 7's loft bed will go. Therefore, more than half of the wall will be {mostly} covered.


Excuse my crude photoshop skills, but you get the picture.


I admit that I feel better knowing that a lot of the orange will be covered up by a giant loft bed. Regardless, 7 loves it. And that's what counts.

Inspiration for the striped loft wall came from here.


image via Ohdeedoh


* * *

Here's your chance to learn from my mistakes. Read this post to see what my #1 tip is for painting stripes!!

This post has been shared with the March Blog Party at It's Great to be Home.

Monday, January 24, 2011

it's a small world


Check out the mini vintage globe bank I got for 7's room.


Adorable, no?

Sunday, January 23, 2011

fingers crossed

Have you ever been in the middle of a project, and you begin to doubt the outcome? You begin to doubt the vision you had in the first place?

I'm in that very spot right now.


I don't want to show photos of the entire poject until it's done, but that above, is a sneak peek.

I've been painting and painting and painting all weekend, and it's still not done. It will be worth it if it turns out nicely.

Keep your fingers crossed.

Friday, January 21, 2011

to do list


sneak peek


Weekend* To Do List

*to be done this weekend and into the week

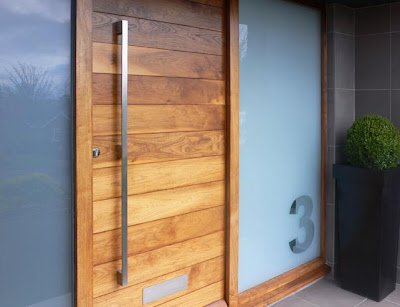
curb appeal :: a new front door

Even though we haven't actually started the renovation yet, that doesn't mean we haven't started dreaming about new looks for the house.

Since we are going for a more contemporary look, we have been eyeing these doors.


both images from Urban Front


Aren't they gorgeous?


***See this post to see how we plan to bump out the front entry.

Thursday, January 20, 2011

an update on the contractors


image via


Some of you may be saying, "So that's really nice and all, Karen. So glad you started ripping up carpet and painting rooms and such, but when does the real work begin?"

Here's the skinny:

The Permit
I dropped off the paperwork for the permit on Dec. 21st. I was told that it would take 3 - 4 weeks to hear back. So any day now...

***updated 1/26: We got our permit back, but there are 15 corrections we need to address.***
***updated 2/3: Architect working on revisions. She should be turning them back in to the city tomorrow.

Contractor #1
Same company that drew our design plans. Although we were extremely happy with their design services, we were bummed that it took them more than a month to give us a bid for the renovation.
Verdict: Too expensive + we are clearly not a priority.

Contractor #2
A referral from our realtor. He was very nice but after thoroughly viewing the plans, he admitted that he really is a "one-man" team and that our job was too big for him. We appreciated his honesty.


Contractor #3
A referral from an acquaintenance. He is very motivated, and we will get his bid in a couple of days. Only drawback is that we haven't seen any of his work (yet.)

***updated 1/26: We received #3's bid.***

Contractor #4
A referral from a friend. We have seen his work and he's good. John met with him yesterday and he has a set of plans, so we should hear back from him soon.


***updated 2/3: We have his bid.***


Contractor #5
A referral from same friend as above. We just heard back from him via phone. John will probably meet with him Friday or Saturday.

***update 1/26: John met with him last week. Waiting to hear back from them.***

***updated 2/3: We have his bid.***

So there you go.
That's what is happening 'round here.

Wednesday, January 19, 2011

boy's room :: painted walls

Will I lose your respect if I admit that as I painted and cut in the last few bits of 7's room, I had Dora the Explorer's theme song running through my head?

"I did it, I did it,... da da da do do da do do doo..."


Working a few hours on Saturday, a few more on Sunday, and a few more on Monday, I completely painted 7's room. We choose a nice, neutral greige for the background color. (greige = grey + beige)

The actual color choice is Benjamin Moore's Revere Pewter.

From the masses of orange color swatches, 7 settled on two: Volcanic Blast and Dragon Fire, both by Behr.


Quote from 7:
"They're both cool colors and they both have cool names."


In preparation for painting the stripes, I needed a temporary visual so that I could play with the height and width of the stripes. I went to Michael's and bought two shades of orange paper similar (but not exactly the same) as 7's color choices.

I decided on a 5" width for the center stripe and a 3" width for the outer stripes. After cutting them to size, I taped them to the wall to get a feel for where I wanted them. My first attempt was too high. But since they were just taped in place, it was easy to relocate the stripes to a lower position.


Voila!


It looks good, right?


The stripes --hereafter known as The Speed Stripe-- will go on these two walls.


I have something else planned for the loft bed wall.


Tomorrow, while both kids are in school, I'll use John's laser level to tape off and prep for painting the stripes. However, I won't paint them because 7 is going to be involved in that process. (You know. Ownership and all that.)

Tuesday, January 18, 2011

it's {jack} hammer time!

Admittedly, this isn't the most interesting --or aesthetic-- subject matter. However, it is part of the renovation process. It can't all be color swatches and tile samples!


As much as he dreaded it, John rented a jackhammer and jackhammered a portion of the garage floor. All in preparation for the new and improved plumbing.


Why go to all this trouble?


As previously mentioned, John is redoing the plumbing because we will be relocating the laundry to the garage. See renovation plans here.


And while he's at it, since he's redoing all the plumbing anyway, he is going to add a small garage bathroom.

When I was growing up, we had a small 1/2 bath in our garage and it proved invaluable for those days when you were working outside and didn't want to bring mud and dirt inside when going to the bathroom.

The picture above isn't "drawn" to scale. It just shows a rough placement of the garage's new features.

Monday, January 17, 2011

kitchen inspiration


image via


I love everything about this kitchen.

sleek white cabinets check
silver handles check
open shelving check
white subway tile check
dark wood floors check
metal counters like 'em but would love 'em better if they were concrete


simple. simple. simple.

Friday, January 14, 2011

to do list


Guess what color 7 wants his room to be.


Weekend* To Do List
  • finish removing tacking strips from 7's room
  • remove closet pieces from 7's closet (to paint)
  • choose (background) neutral color for 7's room
  • begin to cut in corners, etc.
  • jackhammer concrete in garage corner in prep for new plumbing (John)
  • field trip to IKEA in Santa Barbara, to check out kitchen cabinet possibilities
  • oops--no ikea in santa barbara


*to be done this weekend and into the week

Thursday, January 13, 2011

his & hers {projects}

Last weekend, John got started in the backyard and garage, setting up the plumbing for the garage. In the process of pushing the kitchen back 10 feet, the (current) laundry is going to become homeless. Therefore, it's going to need a new home in the garage.


This is the old plumbing, and it's not set up right. (I refuse to type what John really said about it.) John has to re-plumb all of the drain lines and unfortunately, that involves a little bit of digging.


Not exactly an exciting project, but a necessary one at that.


I got started on the floors in 7's room.


With 4's help, I ripped up the old carpeting, foam padding, and staples. I had to leave the tacking strips for another day because I didn't have the proper tools to remove them.


It ain't pretty but I think it looks beautiful.


Work crew having lunch.

Wednesday, January 12, 2011

very little progress

If it looks like we haven't made much any progress with the house, that's because we haven't. But it isn't because we've been twiddling our thumbs and spending days at the beach.

Well. You got me. There were some days at the beach. But we live in a beach town -- what did you expect?!


But we have a good excuse.

No, really.

The house closed escrow at the end of October. We immediately hired an architect to draw renovation plans.

Unfortunately, it took much longer than we anticipated for the architect to finish the plans. We expected to have the finished plans and permit approval by the beginning of December.

It wasn't meant to be.

We managed to barely submit our plans to City Planning before they closed for the holidays. I was told that it usually takes 3 - 4 weeks to get permit approval. And since we were submitting our plans just days before Christmas, it was probably going to take us the full four weeks.

In the meantime, we've been going a little stir crazy wanting to get started.

Here was our dilemna: Where were we to begin?

Many of the rooms and spaces are going to be affected and/or altered. Not all, but many of the existing walls are going to be affected in some way or another.

The areas of the house that we have left to work with are:


  • 7's bedroom
  • downstairs bathroom
  • closet in master bedroom
  • garage

I'm getting started in 7's bedroom. John has the lovely job of working on the garage. More details on that later.

Tuesday, January 11, 2011

3 big changes

We have a lot in store for the little blue house.

Obviously, we have a lot of cosmetic changes, "lipstick and rouge" if you will. However, it is the structural renovations that are more important to us right now.

#1 Bump out the front entry


The plan to bump out the front entry came about as we were talking with the architect. Although we have many ideas about *modernizing* (is that a real word?) the rest of the house, John and I were stumped as how to change the front. The curved section pictured here threw a wrench in the works. The architect suggested that we push the front door out several feet and create a hip roof. We already had plans to convert the fireplace to a gas insert so the need for the chimney stack went away.

#2 Relocate stairs to the back of the house


As mentioned earlier, we will be removing the spiral staircase in the center of the house and the exterior staircase. The staircase will be relocated to the back of the house, as pictured above and below. The above elevation shows what the upstairs will look like, and the elevation below shows what the downstairs floorplan will look like.


#3 Push the kitchen back approx. 10 feet.


We will push the kitchen back so that it lines up with the second story bedroom wall. This is what it looks like now...


so imagine those walls closed up.

And there you have it. Wish us luck.

Monday, January 10, 2011

house tour, part V

The House Tour ends here, in the backyard. This first photo shows the deck just off the back of the house. It is also where the laundry (currently) is.


Here is another view.


In the back right corner of the yard is the outdoor fireplace. Love it!


We have plans to eventually re-face the fireplace and bring it more up to date.


Standing at the fireplace and looking back across the yard...


The blue stairs that you can see in the background lead to the master bedroom. We think that whoever built the upstairs addition, had to add the exterior stairs because it would be impossible to get large pieces of furniture up the spiral staircase.


We will be getting rid of this staircase as well.


This is the future location of where the staircase will be relocated.


There is an additional area off the back of the garage. It will make a great place for a basketball hoop for 7. I also have dreams of building something like this for the kids.

Lastly, the side yard.


There are a lot of beautiful plants in the side yard; however, a lot of it is going to be redone. In fact, there is a LOT to do in the entire back, side, and front yard.

you might also like

Related Posts Plugin for WordPress, Blogger...